Set up VPN. Follow the instructions from ATUS here to set up a VPN client and connect to the University’s VPN. I recommend connecting using the Split Tunnel option - this way only network traffic destined for the wwu.edu domain will flow through Western.
Set up your SSH config. Follow the instructions on the CS Support Wiki here to ensure that your local machine’s SSH config file is set up to access CS labs via the jump server. In particular, make sure you have the sections that define the csjump host and the cf???-??? host. My config file (I’m on Mac OS) includes the following:
 Host cf???-??
   Hostname %h.cs.wwu.edu
   Port 922
   User wehrwes
   ForwardAgent yes
   ProxyJump csjump

Host csjump
   Hostname jump.cs.wwu.edu
   Port 922
   User wehrwes
   ForwardAgent yes
Get a jupyter notebook server running on a remote lab machine. Note: I strongly recommend against using VS Code for any of these steps, even if you’ve used it before; it is unnecessary and only complicates things for our purposes. Open a terminal on your local machine and use ssh to connect to a lab machine of your choice by selecting a room number and machine number. For Fall 2021, it is recommended that you log into a lab machine that is reserved for remote access only. A list of such systems can be found on the CS Support Wiki.
With the above config file set up, you can SSH to a lab machine of your choice using a command such as:
ssh cfRRR-MMwhere RRR should be replaced by a room number (e.g., 405) and MM should be replaced by a machine number (e.g., 04). Once you’re there, navigate to the directory where you plan to store and work on your notebook files, for example:
cd data311/lab1then start a Jupyter notebook server using the following command, using a 4-digit port number of your choice in place of PPPP:
jupyter notebook --no-browser --port=PPPPThis command needs to stay running in order to keep the server running, so you should leave this terminal window alone as long as you need to access the server. To quit the server when you’re done working, press Ctrl-C then enter “y” at the prompt, or press Ctrl-C twice in a row, to shut down the notebook server.
Set up a tunnel. Fortunately but inconveniently, our lab machines are not directly accessible from the internet, so we can’t just point our browser at the server and connect. Instead, we’ll set up an ssh tunnel. This effectively takes any internet traffic going to a particular port on your local machine and transparently sends it off to the remote machine, over a secure SSH connection. In this case, we’re make it seem as though the notebook server is running locally, and in the background send all the traffic over to the remote lab machine. On your local machine, open up a new terminal (separate from the one you used in step 2) and run the following command (replace PPPP, RRR, and MM as before):
ssh -NL PPPP:localhost:PPPP cfRRR-MMThis command needs to stay running in order to keep the tunnel open; on entering the command, you should just see no output and no new prompt for another command. You should leave theis terminal window open with this command running as long as you need to access the server. To close the tunnel when you’re done accessing the notebook server, you can press Ctrl-c and you should be back to a shell prompt.
Connect to the server using a browser. Finally, go back to the terminal where you started the Jupyter server. Among the output, you should see something like the following:
    To access the notebook, open this file in a browser:
        file:///home/wehrwes/.local/share/jupyter/runtime/nbserver-11514-open.html
    Or copy and paste one of these URLs:
        http://localhost:8888/?token=c303308678e757fd3a1dd1dedab3043ff52111964e2f831b
     or http://127.0.0.1:8888/?token=c303308678e757fd3a1dd1dedab3043ff52111964e2f831b
Copy and paste the URL into your browser as directed, and you should be greeted with a functioning Jupyter notebook session.
Once you’ve completed the above, you should be able to begin a session to work on Jupyter with the following steps:
ssh -NL PPPP:localhost:PPPP cfRRR-MM (on your local machine)ssh cfRRR-MM (from your local machine) and go to your 311 directory (e.g., cd 311)jupyter notebook --no-browser --port=PPPP (on the remote machine)To end your session:
exit or pressing Ctrl-d.Problem: when trying to open the SSH tunnel, you see a message like this:
$ ssh -NL 8888:localhost:8888 cf162-08
bind [127.0.0.1]:8888: Address already in use
channel_setup_fwd_listener_tcpip: cannot listen to port: 8888
Could not request local forwarding.
This error message happens because you already have a notebook server running, occupying the requested port on your local computer. In this case, I was running a local server on port 8888 (the default), and tried to tunnel the same port to cf162-08. The solution is to either shut down the local server or pick a different 4-digit port number.
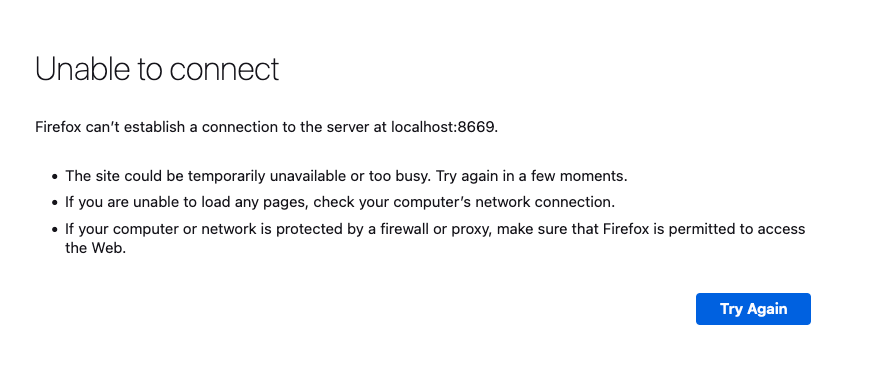
Problem: when trying to connect to the URL given when the server starts, you receive an “Unable to connect” error. For example, in Firefox, I get a page that says:
This is happening because the server started successfully, but the SSH tunnel is not in place. This might be because:
The SSH tunnel hasn’t been created because you forgot to run ssh -NL PPPP:localhost:PPPP cfRRR-MM on your local machine.
The port you chose when starting the server (--port=PPPP) was in use, so the notebook server started on a different port. If you look at the server’s startup message, it might say something like:
[I 15:54:37.696 NotebookApp] The port 8668 is already in use, trying another port.In this case, you’ll notice that the server URL looks like localhost:PPPP, where the server has chosen a different port than you specified; in my case, I asked for 8668 but that was in use so it used 8669 instead. To fix this, simply Ctrl-C to cancel the SSH tunnel command that you ran, and re-run it with the correct port number (in my example, ssh -NL 8669 localhost:8669 cfRRR-MM). Then, you should be able to reload your browser window and be connected to the notebook server as intended.